Sunday, March 1, 2009

Flourless Chocolate Cake: February DB Challenge


I was so excited to see that this month's challenge involved chocolate! Mmmmm delish!  The great thing about this recipe is that it came together very quickly, with easy to follow instructions.  I was thankful as I pushed this one right to the wire as per the challenge deadline. 


I used all semi-sweet chocolate, as I find sometimes that when I mixed chocolates (semi and milk) it never has the desired taste that I am after.  I quite enjoyed the chocolate taste, although I had some critics say that they might have enjoyed a mixture better. ( I will save that for next time!)

As I said, the prep/baking process was quite simple, melted the chocolate and butter, added egg yolks and then the whipped whites making the cake a little "fluffier" given its lack of flour.


Overall I found the cake almost overly moist.  I had thoughts that the cake might even be under cooked, but I did bake it for 5ish minutes longer and followed the instructions of "the top should look like a brownie and cake tester should come out wet", so I am thinking that this was actually the desired affect.  In the end it wasn't my favorite chocolate cake, but I loved making this new version!  Perhaps I will give it another go, with some different chocolate.  Already looking forward to next month!

Credits:
The February 2009 challenge is hosted by Wendy of WMPE's blog and Dharm of Dad ~ Baker & Chef.
We have chosen a Chocolate Valentino cake by Chef Wan; a Vanilla Ice Cream recipe from Dharm and a Vanilla Ice Cream recipe from Wendy as the challenge.

Thursday, January 29, 2009

Tuiles: January DB Challenge


I don't have much time to write about the baking process for these tuiles, so I will leave you with this pic for now and hopefully be able to write more tomorrow!!! 

Credits:
This month's challenge is brought to us by Karen of Bake My Day and Zorra of 1x umruehren bitte aka Kochtopf. They have chosen Tuiles from The Chocolate Book by Angélique Schmeink and Nougatine and Chocolate Tuiles from Michel Roux.


Saturday, November 29, 2008

Caramel Cake: November DB Challenge


I was so excited that the November challenge was not only sweet in nature but also a cake!  I had never made a caramel cake before....in fact I have never even eaten a caramel cake before.  I like caramel, but the thought of a whole cake devoted to such a sweet made my teeth hurt just reading the recipe.  But alas this is the point of the DBs!! To push you out of your baking comfort zone to try new and exciting recipes each week.  So spirits were high heading into this adventure.

Step One:  The Caramel Sauce - This part was by far the most exciting to me.  As I mentioned I have never made caramel before so this part was definitely fun.  I know with sauces of this nature burning it can occur quicker than you think.  One minute the sauce is all brownish and caramelized and then *poof* blackened sticky goo.  So being my extra cautious self I was a constant monitor and probably could have cooked it just a little longer (although really now I am just being picky).  And one thing this recipe is bang on about is the crazy sputter action that happens when you pour in the water....STAND BACK! 

Step Two: The Cake - Overall I felt this to be a pretty standard issue cake (minus the addition of the caramel sauce above).  Now one thing that I find frustrating with cakes is that sometimes I find that they don't rise as much as I would like them to.  Now what does this stem from....perhaps my butter was sufficiently at room temp?  Not enough baking powder?  Room temperature eggs?  To me this is just as mysterious as the "caramel secret" (ohhhh....such a bad pun, but I had to).  I think perhaps because my cake didn't rise as much as I wanted it, it became somewhat dense once it was baked.

Step Three: Caramelized Butter Frosting - I think the frosting actually turned out pretty well for me.  I am not a huge icing fan to begin with, so sometimes it is hard for me to judge what a great frosting should taste like.  Overall this might have been the best part of the cake for me.

With the cake finally baked and frosted it was time to test my hand at a little decorating flare.  I would have loved to have actually made caramels from scratch, but I buckled and bought some store bought caramels and crushed them.  I then just placed them around the sides of the cake for a subtle yet scrumptious touch.  (I take my frosting comment back....this was the best part of the cake). 

Overall it was a great experience, but those who had my cake had the same comments as I did. "Sort of dense", "Very sweet", and "Not your best work"....sigh....my baking education continues. 


Credits:

Wednesday, October 29, 2008

Pizza! October DB Challenge


I'm not sure if this pic is more about the pizza or the wine!  Either way they were both good.  This was my first challenge as part of the daring bakers and I was so glad it was a savory one!  I have never made pizza dough before and although I swear it is probably an easy process I felt a little pressure.  I had actually never worked with yeast before either, so I was unused to the consistency of what the dough should really feel like.  I played around with it and ended up splitting the dough in half (adding much more flour to the second half).  In the end I sort of used a combination of both doughs (it was a pretty random process but turned out great nonetheless).

I decided to make two different types of pizzas with two different types of sauces.  First I made the pizza shown at the top of this post.  It is a pesto, chicken and sundried tomato pizza.  The next pizza is to the left here and has tomato sauce, green pepper, red onion, tomato and pancetta.

Overall it was a great experience and I actually can't wait to try out this recipe again.  Thanks DB for pushing me out of my baking comfort zone!

Monday, October 20, 2008

Banana Muffins


Mmmmm!  Banana muffins are one of my favorites!  In order to satisfy cravings immediately I usually freeze bananas that have started to turn, as then flavors are at there peak.  I hunted around for a recipe and in the end I used a fairly easy one outlined below.

Ingredients 
  • 5 large bananas (one banana sliced for topping)
  • 1 1/2 cups flour
  • 1/2 cup sugar
  • 1 egg slightly beaten
  • 1/3 cup melted butter
  • 1 tsp baking powder
  • 1 tsp baking soda
  • 1/2 tsp salt
Mix together 4 mashed bananas, sugar, butter and egg and set aside.  In a separate bowl mix together dry ingredients (flour, baking powder, baking soda and salt).  Add dry ingredients to the banana mixture, being careful not to over stir.  Pour muffins into a greased muffin tin and drop a slice of banana on top before baking.  Bake in a 350 degree oven for approximately 20mins.  Cool and enjoy!

I find that banana muffins are one of the very few things I don't like eating warm out of the oven.  Often I find that these muffins need to cool before you can really taste that great banana flavor.

Another note I thought I would add is that these muffins are best enjoyed the day that they are baked.  The banana slice on top will turn brownish if left over night - although don't worry - they still taste fantastic!  But if you do wish to preserve the nice fresh white/yellow look of the banana slice then try using dried banana chips instead.

Saturday, October 4, 2008

Apple Pie


Apples!!!! My favorite time of the year is fall.  Not only are the colors fantastic, all the reds, yellow and oranges, but the local markets are bursting with fresh foods.  Every year I go and pick my own apples...there is something slightly comforting about harvesting the food yourself that makes the baking process feel complete!  It may be time consuming but it is well worth it.  


The recipes I used for both the pastry and the filling were both, well...organically inspired.  I like making my pastry in a food processor and freezing it for at least 24 hours before using.  There is a combination of both butter and shortening used as well as some vinegar.  I will try to dig up the recipe and post it latter when I have time.  Although...as mentioned, I sort of play around with my pie recipes.  The filling is very standard...apples, lemon juice, brown sugar, cinnamon and a touch of flour.  I used cortland and macoun apples (which is actually a new combo for me....I have heard some people say that cortlands are not good for baking but have also heard of some who love them.  Of course tart apples are the best, but I had some cortlands that I wanted to use up so I thought I would give it a try.  The macouns were added mostly because I think that at least two different types of apples are needed for a great apple pie.

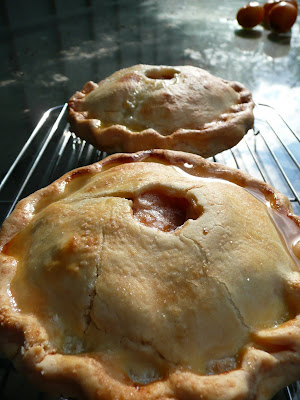
As I love to bake....a lot....I find that I try to pawn my baked goods off on my friends (hopefully they like them and I am not he annoying friend who always shows up with unwanted baked goods!!!).  For me, I can just not possibly consume all that I bake...hence the pawning.  So this time I made small 6 inch mini pies....perfect for a gift, as sometimes the regular 9 inch pies can be a lot to handle.  I of course needed to find a cute way to package them (as presentation is everything!), so I decided to put them in little boxes I found, with some decorative paper and ribbon.  I thought the boxes looked cute and so did my friends! 


Friday, October 3, 2008

Birthday Cupcakes!


So not only am I new to this whole blog thing...but I am also new at taking pictures of my baking!!!  I feel like I have made a lot of things as of late....peanut butter brownies, peach crisps, cookies, and a lasagna (my first....who knew they were so much work!?!).  The lasagna was added as I am trying to branch out and actually make "real" meals.  Although I would like to think that a blueberry pie, followed by some chocolate chip cookies constitutes a "real" meal....I think not...hence the lasagna.

Now you see....my problem is not in actually making the stuff....it is photographing it!!! Especially if it is something fresh out of the oven that is designed to be eaten right away!!! I don't want it to cool while I take a billion pics (clearly a billion have to be taken as I am not a fantastic photographer...although would love to be!!!)


Anyways...long story short.  I finally got around to taking some pics of cupcakes.  I confess that cupcakes are not my specialty (although I am starting to wonder what actually is).  I have tired a bunch of recipes for cakes and icing and can't seem to find one I like more than that good old faithful store bought boxed mix (sigh...the journey continues).  If anyone knows a fool proof recipe I would LOVE to try it....especially icing...I really like piping it on...this most recent one I used though wasn't as stiff as I would have liked it and it started to slide a little...oh well....there is always next time!


The actual  recipe I used is from Martha Stewart's website.  It came recommended off of another blog I looked at...sorry I can't remember which one!  And I would agree with some of the comments on her site.  I found the cake was not as light and fluffy as I would have liked, but other than that the flavors were great.  As for the icing.....well it tasted good...but again...I should probably have just spread it on the cake instead of piping (it just always looks soooo good piped that I couldn't help myself!)

And as for the pics....well these are going to have to be a work in progress!  I really wish there were some courses I could take just on food photography!  Hmmm....perhaps I will do some hunting on that one.